It is much easier to keep the water away from the ground around your home than to deal with the consequences. Installing Rain gutters are the sensible way to keep from spending thousands on foundation repairs and flooding damage. Gutters also add an attractive finish to your home. If you need to know about installing rain gutters, Hollister Roofing Inc., a California roofing contractor with over 25 years’ experience has provided some guidelines.
Equipment/Tools needed:
- Ladder – length depends on the height of your roof
- Tape measure
- Levels (string and carpenter’s)
- Chalk line
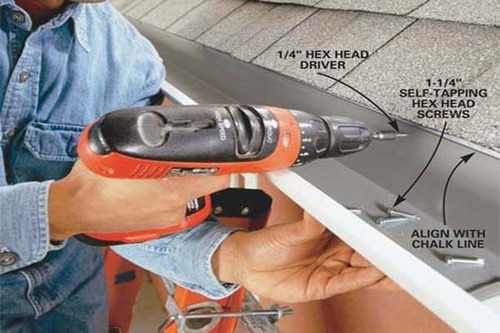
- Power drill and screwdriver bits
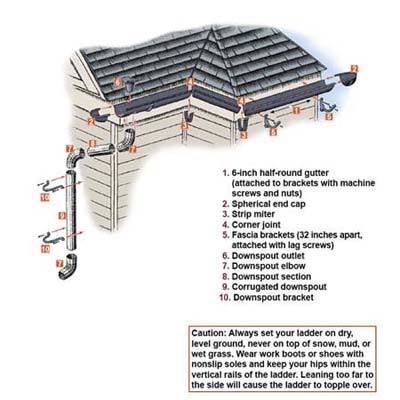
- Vinyl gutters, hangers, connectors, elbows, downspouts, drop outlets, corners
- Fine tooth hacksaw or heavy duty snips
- Rust resistant (galvanized) screws
Before you begin to learn about installing rain gutters, you need to know that it is not a job for the casual weekend DIY guy. Many do-it-yourselfers have attempted gutter installation and ended up calling a professional roofing contractor to fix or finish the job.
Ladder – you will need to climb up and down the ladder multiple times when installing rain gutters. If you are not comfortable on a ladder outside, possibly on uneven ground, this job won’t be for you.
Helper(s) – The term do-it-yourself is just an expression when it comes to rain gutters. You will need at least 1 and preferably 2 helpers for this job. It is very close to impossible as well as very dangerous for the inexperienced homeowner to climb a ladder while holding a length of the rain gutter and try to attach it to the fascia.
Price – Most homeowners imagine that a do it yourself project like installing rain gutters will be cheaper than hiring a professional roofing contractor. This is often a mistake, as contractors can usually get a lower price for the materials since they buy in volume. Get some estimates from suppliers and contractors before you decide it is a DIY project you want to tackle.
To begin installing rain gutters you will need to locate the highest point of the gutter run. Mark the point on the fascia, 1.25 inches below the roof flashing. Locate the downspout location of the gutter run. Mark the lower end point on the fascia, while calculating the slope of the gutter .25 inches for every 10 feet of length. Snap a chalk line between the two points. Cut the gutters to size using a hacksaw, or heavy duty tin snips to the right size.
Attach the gutter brackets – depending on the type you purchased, they will either they will either snap onto the gutters or will be mounted into the face board first. Mark the location of the downspout opening on the gutter and use the jigsaw to cut a square hole at the right place in the gutter.
Attach the downspout connector and end cap to the gutter using short metal screws and silicone sealant. An end cap should be used on every open end of the gutter.
Mount the gutters – brackets should be attached to the face board every 18-24 inches. Ensure the galvanized lag screw is long enough to go 2 inches into the face board seal all the seams with silicone.