It’s not uncommon for the hot sun to do some damage to your roof throughout the summer season.
But if you have a leak started it’s critical to repair it before the stormy season arrives and it’s too late.
If you let a leak go unfixed, even if it’s small, it can lead to mold problems, rotted framing, and very costly repairs.
To protect your home throughout the fall and winter, we’ve compiled some easy tips that will teach you how to detect and fix a leak quickly before it gets worse.
Finding A Leak
If you see any water stains on your ceilings, that’s your first sign that you have a problem. Mold in your home, or a musty odor can also be indicators of a problem.
But while recognizing a leak may be simple, finding the source of one isn’t always as straightforward.
If you have access to your home’s attic, your job could potentially be easier.
Use a flashlight on your attic ceiling, and check for any areas where light escapes through the plywood. You will also want to check the ceiling over for water damaged wood and mold.
If you don’t have attic access, it’s time to start inspecting your roof.
Rarely will you find a leak under an area with uninterrupted shingles or metal sheets. The vast majority of roof leaks are in areas where the roof has been penetrated by chimneys, plumbing, piping, or vents.
To confirm the exact source of a leak, you can try running a hose over one area at a time and ask a helper inside the home to tell you when a drip appears.
You may need walkie talkies or cell phones to be able to communicate well during this process.
It’s important that you really soak your roof and let the hose run for a good five minutes over each spot before you move on to the next.
You can also remove shingles over the area of the suspected leak. If you’re close to the leak, the evidence should be clear.
The felt paper underneath your shingles will be discolored and you may even see water-stained boards or mold growth.
If your leak does indeed stem from a roof vent, chimney, or even a dormer wall, repairing the area and replacing the old vent may be in order.
If you can’t seem to find the source around the areas where your roof has been penetrated, look carefully for damaged, buckling, or missing shingles. If you have a metal roof, look for rusty areas, or holes.
Even small holes left behind from old satellite fixtures can lead to a leaking roof over time. If you find damaged shingles or metal, you’ll need to patch or replace them.
It may be tempting to rely on caulking to fix small leaks, but this will never be a long term solution. It’s always best to replace the materials or fixtures that have caused a leak in the first place.
How To Fix A Damaged Shingle
If your roof is leaking due to damaged shingles, it’s fairly easy to do the repair yourself.
Each shingle is fastened down with 8 nails, and with a pry bar, you’ll need to carefully lift up all of the surrounding shingles that cover those nails in order to remove them.
Once you’ve loosened the surrounding shingles, push your pry bar up under the damaged shingle and gently rock the bar while pulling up so you can detach your shingle without ripping it.
Once the damaged shingle is removed, put the new shingle in place. Now nail the center row, then the center row of the shingle above it, then at the top of the slots just above the sealant strip. Repeat on other damaged shingles as needed.
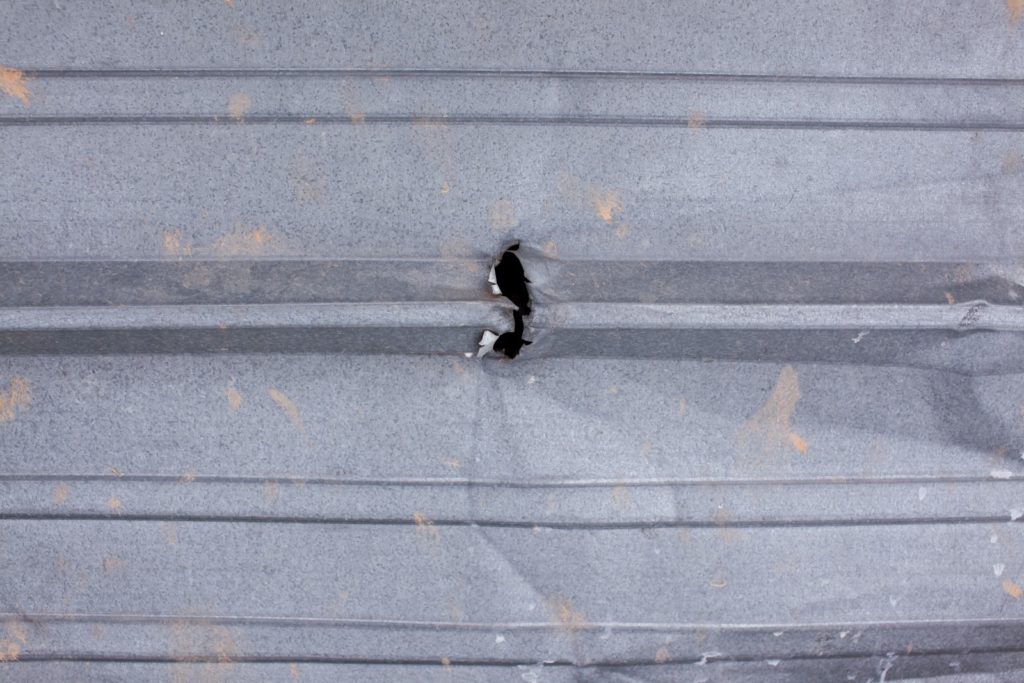
How To Fix A Metal Roof
To repair a leak in a metal roof, start by thoroughly cleaning the damaged area. You want to make sure that there is no dirt or cleaner residue left behind.
Next, use a wire brush to scuff up the repair area. This will help the sealant bond to the metal on the area to be patched.
Measure the damaged area, and cut out a piece of matching sheet metal roofing that will overlap the damaged area by about two inches. Round out any jagged corners with a file.
Using a pencil, put your metal patch in place, and trace its outline. Now check to be sure there’s a two-inch overlap on each side of the damaged area.
Liberally apply a color-matched urethane sealant to the damaged area, staying just inside your pencil line.
Press the patch into place. You want the sealant to ooze out from all sides of the patch to ensure no moisture can build up in any gaps. If the sealant isn’t oozing from a side, apply more sealant there. Repeat on other damaged areas as needed.
While roof repairs can seem intimidating, small leaks are actually fairly easy for your average homeowner to locate and repair on their own.
But remember – if you are dealing with large leaks, rotted framing, heavy mold, or you just can’t seem to locate the leak source on your own, never be afraid to call in an expert.